
Important: Email inboxes work by forwarding your business emails to ZappWay. Your AI Employees automatically respond based on their assigned knowledge and instructions. Currently, emails are sent from your-alias@mail.zappway.ai.
🔢 Table of Contents
- Overview
- Prerequisites
- Getting Started
- Available Features
- Common Use Cases
- Email Provider Setup
- Troubleshooting
- Best Practices
1. Overview
What is Email Inbox?
Email Inbox allows you to automate email responses using AI. Forward emails from your business address to ZappWay, and your AI Employee will automatically process and respond to them based on their knowledge base and instructions.Key Features
- Email Forwarding: Simple setup with any email provider
- AI-Powered Responses: Intelligent replies based on your knowledge base
- Multiple Inboxes: Create separate inboxes for different purposes
- Knowledge Integration: Connect datastores and datasources for context
- AI Employee Assignment: Assign specific AI Employees to handle emails
- Status Dashboard: View assigned AI and connected knowledge sources
- 24/7 Automation: Never miss an email, even outside business hours
How It Works
- Customer sends email to support@yourcompany.com
- Your email provider forwards it to your ZappWay inbox
- AI Employee reads the email and searches assigned knowledge base
- AI generates appropriate response
- Reply is sent from your-alias@mail.zappway.ai
What You Can Do
With Email Inbox:- Automate customer support responses
- Qualify sales leads automatically
- Handle FAQ inquiries 24/7
- Provide instant responses to common questions
- Reduce support team workload
- Scale email operations efficiently
Current Limitations
Important to Know:- ⚠️ Emails are sent from your-alias@mail.zappway.ai (not custom domain)
- ⚠️ No custom sender verification available yet
- ⚠️ Basic email forwarding only (no advanced routing)
- Custom domain sender addresses
- Email verification system
- Advanced routing and filtering
- Email templates
- Analytics dashboard
2. Prerequisites
Before You Begin
Required:- Active ZappWay account
- Existing business email address (e.g., support@company.com)
- Access to email provider settings (for forwarding setup)
- At least one AI Employee created in your organization
- Knowledge base (datastores/datasources) prepared
- Clear use case for email automation
- Test email account for initial setup
Email Provider Access
You’ll need access to:- Email forwarding settings
- Admin account if using company email
- Ability to configure forwarding rules
- Gmail / Google Workspace
- Outlook / Microsoft 365
- Yahoo Mail
- ProtonMail
- Any provider with forwarding capability
AI Employee Requirements
Your AI Employee should have:- Clear instructions for email responses
- Connected knowledge base (datastores/datasources)
- Appropriate tone and style guidelines
- Escalation rules if needed
- Concise response style
- Professional tone
- Clear escalation guidelines
- Email-specific formatting
3. Getting Started
Quick Setup (10 Minutes)
Follow these steps to set up your first email inbox:Step 1: Create Email Inbox
- Log in to your ZappWay dashboard
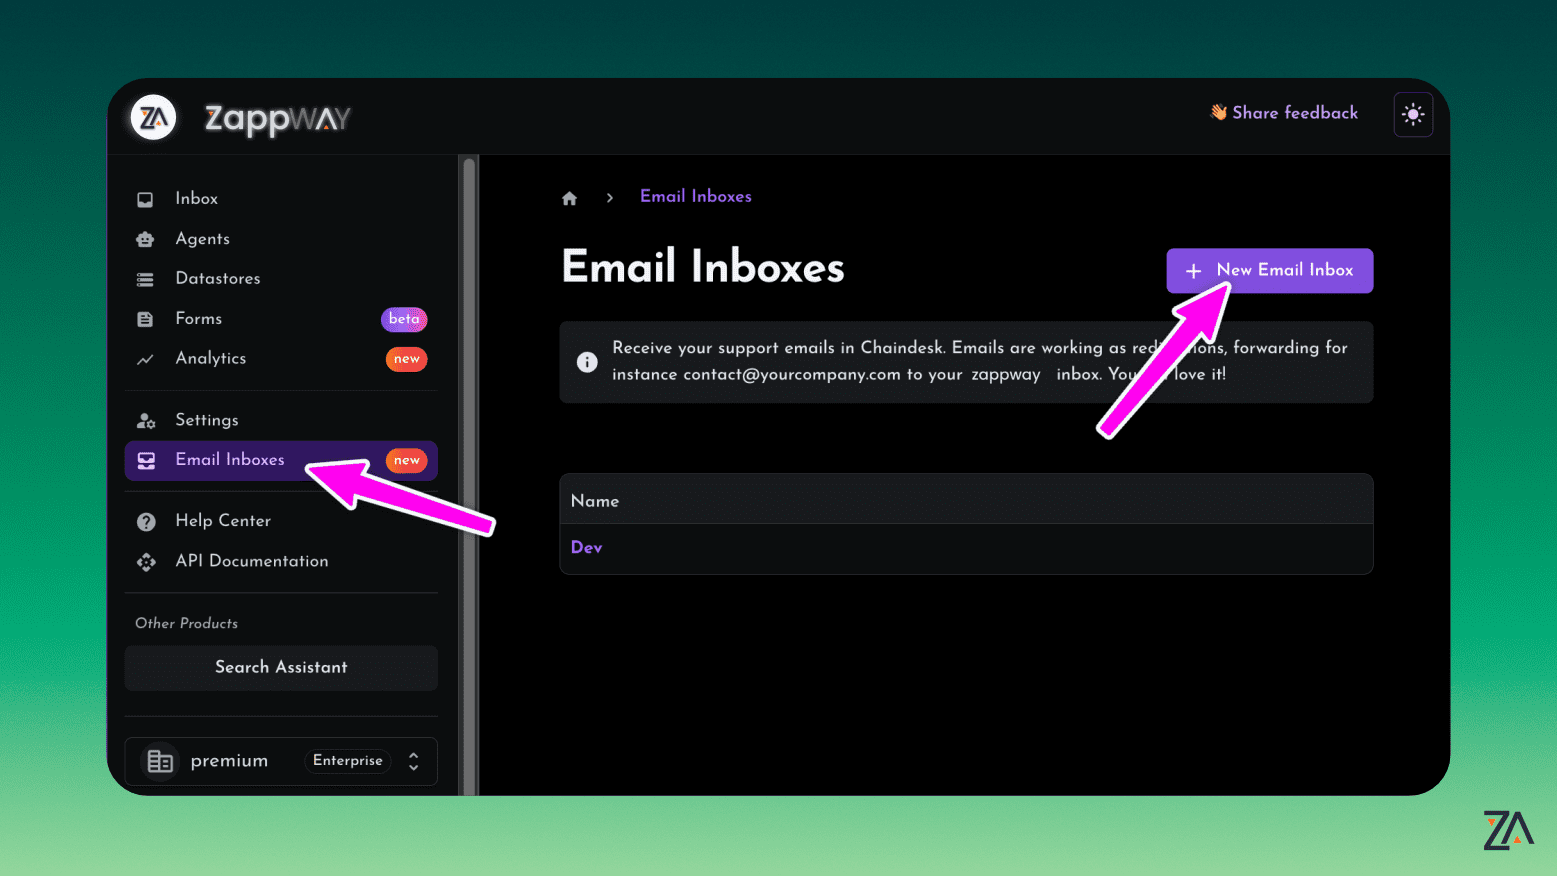
- Navigate to Email Inboxes from the left sidebar
- Click “Create New Inbox” or “New Email Inbox” button
Step 2: Configure Inbox Name
Enter Inbox Name:- Provide a descriptive name for your inbox
- This name is for your internal organization only
- Examples: “Customer Support Inbox”, “Sales Inquiries”, “General Info”
- Use clear, descriptive names
- Include department or purpose
- Consider adding language (e.g., “Support - EN”, “Suporte - PT”)
- Avoid generic names like “Inbox 1”
- Format:
[your-alias]@mail.zappway.ai - Example:
a1b2c3d4e5@mail.zappway.ai
Step 3: Enable AI Responses
Activate AI Toggle:- In the inbox Settings tab, find the “Activate AI” toggle
- Switch the toggle to ON (enabled state)
- The AI configuration section will expand below
- Without AI enabled, emails are received but not responded to
- AI must be active for automatic responses
- You can disable AI temporarily without deleting the inbox
Step 4: Select AI Employee
Choose from Existing AI Employees:- Click the AI Employee dropdown selector
- Browse or search your existing AI Employees
- Select the appropriate AI Employee for this inbox
- Click ”+ Create AI Employee” option in dropdown
- A modal form will open
- Fill in the AI Employee details:
- Name: Descriptive name
- Instructions: Detailed behavior guidelines
- Tools: Enable necessary tools
- Model Settings: Configure model preferences
- Click “Create” to save
- The new AI Employee is automatically assigned to the inbox
Step 5: Add Knowledge Sources (Optional)
Why Add Knowledge: Knowledge sources provide context and accurate information for AI responses:- Datastores: Collections of documents (help docs, FAQs, policies)
- Datasources: Individual files (product manuals, guides)
- In the AI configuration section, find the Knowledge selector
- Click to open the knowledge picker modal
- Search and Select:
- Type to search available datastores and datasources
- Click to select one or multiple items
- Selected items appear as chips
- Click “Select” or “Save” to confirm
Step 6: Save Configuration
- After selecting AI Employee and knowledge sources
- Click the “Save” or “Select” button
- Configuration is saved immediately
- Inbox Name: Your configured name
- Assigned AI Employee: Name and unique ID
- Connected Datastores: List of datastores (if any)
- Connected Datasources: List of datasources (if any)
Step 7: Set Up Email Forwarding
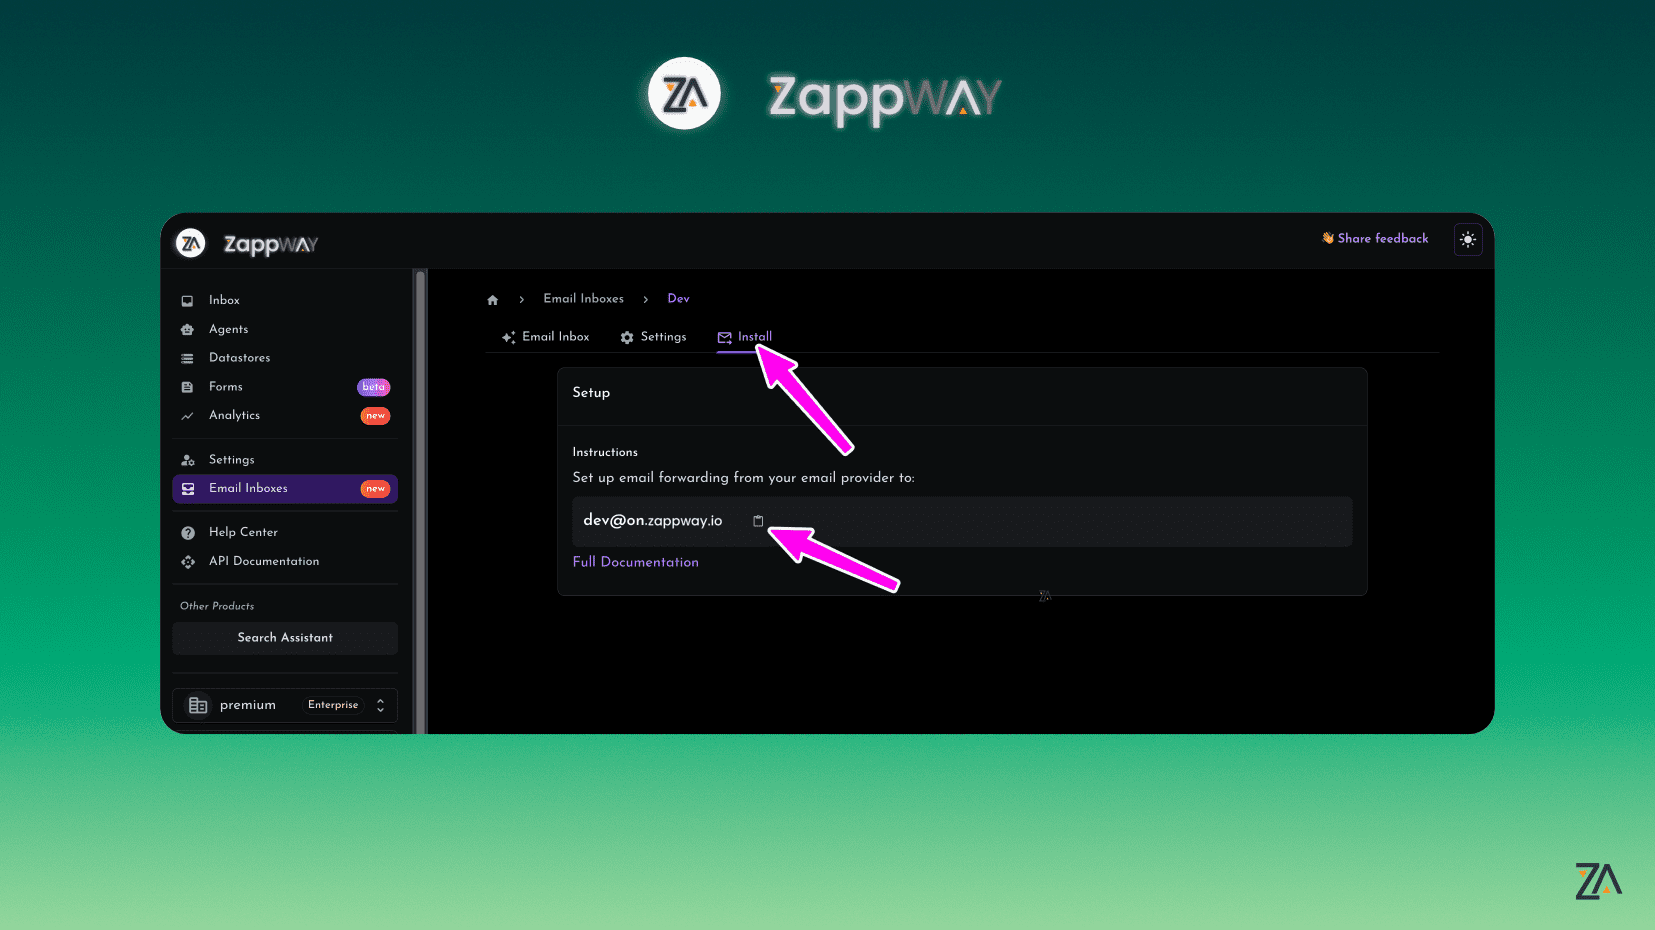
Get Your Forwarding Address:- Navigate to the “Install” or “Forwarding” tab in your inbox
- Copy the displayed forwarding address
- Format:
[your-alias]@mail.zappway.ai - This is unique to your inbox
- Format:
- Log in to your email provider (Gmail, Outlook, etc.)
- Go to email forwarding settings
- Add the ZappWay forwarding address
- Enable forwarding and save
Step 8: Test Your Setup
Send Test Email:- From another email account, send a test email to your business email
- Subject: “Test”
- Body: “This is a test email to verify the inbox is working.”
-
In ZappWay:
- Check inbox view for received email
- Verify AI response was generated
- Review response quality
-
In Test Email Account:
- Check for response email
- Verify sender address (your-alias@mail.zappway.ai)
- Review response content
- Check formatting is proper
- Wait 2-3 minutes (processing can take time)
- Check spam/junk folders
- Verify forwarding is enabled
- Review troubleshooting section below
- Go back to inbox Settings
- Modify AI Employee instructions
- Add or adjust knowledge sources
- Save changes
- Test again
4. Available Features
Feature 1: Email Inbox Management
Create and manage multiple email inboxes for different purposes from a centralized dashboard. What You Can Do: Create Inboxes:- Set up unlimited inboxes (based on plan)
- Assign unique names for easy identification
- Each inbox gets unique forwarding address
- Independent AI and knowledge configuration
- See all inboxes in one dashboard
- Monitor inbox status and activity
- Quick access to settings
- View assigned AI and knowledge
- Update inbox names
- Change AI Employee assignments
- Modify knowledge base connections
- Enable/disable AI responses
- Delete unused inboxes
- Inbox Name: Your custom identifier
- Forwarding Address: Unique inbound address
- AI Status: Active/Inactive indicator
- Assigned AI: Name of AI Employee
- Action Buttons: Settings, View Messages, Delete
Feature 2: AI Employee Assignment
Assign specialized AI Employees to handle different types of emails for each inbox. Why Assign AI Employees: Each inbox can have its own AI Employee to:- Handle specific types of inquiries
- Use relevant knowledge bases
- Apply appropriate tone and style
- Follow department-specific processes
- Scale operations efficiently
- Open inbox Settings
- Enable “Activate AI” toggle
- Click AI Employee dropdown
- Select from your organization’s AI Employees
- Save configuration
- Open inbox Settings
- Enable “Activate AI” toggle
- Click ”+ Create AI Employee” in dropdown
- Fill in creation form:
- General settings (name, description, instructions)
- Tools configuration
- Model and prompt settings
- Click “Create”
- AI Employee is automatically assigned to inbox
- Instructions: Detailed behavior guidelines
- Knowledge: Connected datastores and datasources
- Tools: Enable specific integrations
- Model Settings: Temperature, token limits, etc.
- Go to inbox Settings
- Select different AI Employee from dropdown
- Adjust knowledge sources if needed
- Save changes
- New configuration takes effect immediately
- Different languages: English support vs Portuguese support
- Different functions: Sales vs Support vs General info
- Different expertise levels: Tier 1 vs Tier 2 support
- Different tones: Formal vs casual
Feature 3: Knowledge Base Integration
Connect datastores and datasources to provide AI with context and information for accurate responses. What is Knowledge: Datastores:- Collections of multiple documents
- Organized by topic or category
- Examples: Help documentation, FAQ database, product manuals
- Suitable for broad knowledge areas
- Individual documents or data sources
- More focused and specific
- Examples: Single PDF, specific guide, latest policy
- Suitable for specific information
- Accuracy: AI uses your actual documentation
- Consistency: Same correct information every time
- Currency: Update knowledge to reflect latest changes
- Expertise: AI becomes expert in your domain
- Reduced Errors: Less hallucination and incorrect info
- Email Received: Customer sends question
- AI Searches Knowledge: Semantic search across connected sources
- AI Finds Information: Retrieves most relevant content
- AI Generates Response: Uses found information to answer
- AI Cites Sources: References documents when appropriate
- Response Sent: Email with accurate information
- Go to inbox Settings tab
- Find the Knowledge selector section
- Click to open knowledge picker
- Search for datastores or datasources by name
- Select one or multiple items
- Selected items appear as chips
- Click “Save” to apply
- Multi-select: Choose multiple datastores and datasources
- Search functionality: Type to filter available items
- Grouped by type: Datastores and datasources separated
- Visual feedback: Selected items shown as removable chips
- Easy removal: Click X on chip to remove selection
- Go to inbox Settings
- Click knowledge selector
- Add new items or remove existing ones
- Click “Save”
- Changes take effect immediately
- Keep knowledge current and updated
- Use clear, well-organized documents
- Include common questions and answers
- Test AI responses after updates
- Remove outdated information
- Organize by topic or department
- Overload with too many sources (slows responses)
- Mix unrelated topics in same inbox
- Leave outdated policies or information
- Forget to update after product changes
- Use unclear or poorly formatted documents
Feature 4: Activate AI Toggle
Control when AI automatically responds to emails with a simple on/off switch. What It Does: The “Activate AI” toggle allows you to:- Enable or disable automatic AI responses
- Keep inbox active without AI intervention
- Manually control when AI should respond
- Test configurations before going live
Use Cases for Disabling AI:
Temporary Disable:
- Testing new configuration
- During system maintenance
- When you want manual responses only
- Troubleshooting issues
- Inbox used only for receiving (not responding)
- Manual review before AI response
- Backup inbox without automation
- Go to inbox Settings
- Find “Activate AI” toggle
- Switch to ON position
- Configure AI Employee and knowledge
- Save configuration
- Go to inbox Settings
- Find “Activate AI” toggle
- Switch to OFF position
- Configuration is saved but not used
- Emails still received, just not responded to
- Disabling AI doesn’t delete configuration
- You can re-enable without reconfiguring
- Emails are still received when disabled
- Perfect for testing before going live
Feature 5: Inbox Status Dashboard
View real-time status and configuration of each email inbox from the main dashboard. What You See: For Each Inbox:- Inbox Name: Your custom identifier
- Forwarding Address: Where to send emails
- AI Status: Active or Inactive
- Assigned AI Employee: Name and ID
- Connected Knowledge: Datastores and datasources count
- Recent Activity: Last email received (if available)
- Settings: Modify inbox configuration
- View Messages: See received emails
- Delete: Remove inbox permanently
Monitoring Features:
At a Glance:
- See all inboxes in one view
- Quick status check for each
- Identify configuration issues
- Access settings quickly
- Dashboard shows saved configuration
- Refresh page to see latest status
- No automatic updates currently
5. Common Use Cases
Use Case 1: Customer Support Automation
Scenario: Provide instant responses to customer support emails 24/7. Setup: Create Inbox:- Name: “Customer Support Inbox”
- Forward from: support@yourcompany.com
- Forward to: inbox-xxxxx@mail.zappway.ai
- Datastore: “Help Documentation”
- Datastore: “FAQ Database”
- Datastore: “Troubleshooting Guides”
- Datasource: “Product Manual”
- Datasource: “Common Issues & Solutions”
- Instant responses (even at 3 AM)
- Consistent, accurate information
- Reduced support ticket volume
- Better customer satisfaction
- Support team focuses on complex issues
- Scale support without hiring
Use Case 2: Lead Qualification
Scenario: Automatically qualify sales leads from email inquiries. Setup: Create Inbox:- Name: “Sales Inquiries Inbox”
- Forward from: sales@yourcompany.com
- Forward to: inbox-xxxxx@mail.zappway.ai
- Datastore: “Product Catalog”
- Datastore: “Pricing Information”
- Datastore: “Case Studies”
- Datastore: “Competitive Analysis”
- Datasource: “Sales Scripts”
- Datasource: “Objection Handlers”
- Datasource: “ROI Calculator Guide”
- Immediate lead response (no delays)
- Consistent qualification process
- Better lead prioritization
- More efficient sales team
- Higher conversion rates
- 24/7 lead capture
- No leads slip through cracks
Use Case 3: General Information Requests
Scenario: Handle general inquiries about company, services, and contact information. Setup: Create Inbox:- Name: “General Information Inbox”
- Forward from: info@yourcompany.com
- Forward to: inbox-xxxxx@mail.zappway.ai
- Datastore: “Company Information”
- Datastore: “Services Overview”
- Datasource: “Contact Directory”
- Datasource: “Office Locations”
- Datasource: “FAQ - General”
- Instant information provision
- Proper routing to departments
- Reduced general inquiry load
- Better first impression
- Consistent company information
6. Email Provider Setup
Gmail / Google Workspace
Step-by-Step Guide:-
Access Gmail Settings:
- Open Gmail in your web browser
- Click the gear icon (⚙️) in the top right corner
- Select “See all settings”
-
Navigate to Forwarding:
- Click the “Forwarding and POP/IMAP” tab at the top
- Find the “Forwarding” section
-
Add Forwarding Address:
- Click “Add a forwarding address” button
- Enter your ZappWay forwarding address:
- Click “Next”
- Click “Proceed” in the confirmation dialog
-
Verify Forwarding:
- Google sends a confirmation email to the ZappWay address
- ZappWay automatically confirms this (no action needed from you)
- Wait 1-2 minutes for the verification to complete
- Refresh your Gmail settings page
-
Enable Forwarding:
- Once verified, select “Forward a copy of incoming mail to”
- Choose your ZappWay address from the dropdown
- Select what happens to Gmail’s copy:
- “Keep Gmail’s copy in the Inbox” (recommended) ✓
- “Mark Gmail’s copy as read”
- “Archive Gmail’s copy”
- “Delete Gmail’s copy”
- Click “Save Changes” at the bottom
- You can still see all emails
- Human agents can access if needed
- Backup in case of issues
- Audit trail maintained
- Send a test email to your Gmail address
- Check that a copy appears in Gmail inbox
- Check that copy appears in ZappWay inbox (may take 1-2 minutes)
- Verify AI responds appropriately
- Confirm response is sent from your-alias@mail.zappway.ai
- Verification doesn’t complete: Wait 5 minutes and refresh page
- Forwarding address not copying correctly: Ensure no extra spaces
- Emails not forwarding: Check forwarding is enabled (not disabled)
- Delays in forwarding: Normal, can take 1-3 minutes
Outlook / Microsoft 365
Step-by-Step Guide:-
Access Outlook Settings:
- Open Outlook.com or Outlook web app
- Click the gear icon (⚙️) in the top right for Settings
- Select “View all Outlook settings” at the bottom
-
Navigate to Forwarding:
- In the left sidebar, click “Mail”
- Select “Forwarding” from the submenu
-
Enable Forwarding:
- Check the box “Enable forwarding”
- In the text field, enter your ZappWay forwarding address:
- Check “Keep a copy of forwarded messages” (recommended)
- Click “Save” at the top
- Send a test email to your Outlook address
- Verify copy stays in Outlook inbox
- Check that copy appears in ZappWay (may take 2-3 minutes)
- Confirm AI response is generated
- Verify response is sent from your-alias@mail.zappway.ai
- Forwarding not working: Ensure checkbox is checked (enabled)
- Address not accepting: Verify no typos in forwarding address
- Delayed forwarding: Normal for Outlook, can take 2-5 minutes
- Changes not saving: Try different browser or clear cache
- You may need admin permissions to enable forwarding
- Some organizations disable forwarding for security
- Contact your IT administrator if forwarding option is unavailable
- Consider using email rules as alternative if forwarding blocked
Yahoo Mail
Step-by-Step Guide:-
Access Yahoo Settings:
- Log in to Yahoo Mail
- Click the gear icon (⚙️) in the top right corner
- Select “More Settings” from the dropdown
-
Navigate to Forwarding:
- In the left menu, click “Mailboxes”
- Select your email address from the list
- Scroll down to the “Forwarding” section
-
Add Forwarding Address:
- In the forwarding field, enter your ZappWay address:
- Select “Store and forward” (keeps copy in Yahoo)
- Click “Verify” button
- In the forwarding field, enter your ZappWay address:
-
Confirm Verification:
- Yahoo sends a verification email to the ZappWay address
- Check your ZappWay inbox for the verification email
- Click the verification link in the email
- Return to Yahoo Mail settings page
-
Enable Forwarding:
- After verification, the forwarding section updates
- Check the “Enable automatic forwarding” box
- Ensure “Store and forward” is still selected
- Click “Save” button
- Send test email to your Yahoo address
- Verify copy remains in Yahoo inbox
- Check ZappWay inbox for forwarded copy (2-3 minutes)
- Confirm AI generates response
- Check response is sent properly
- Verification email not received: Check ZappWay inbox and spam
- Verification link expired: Request new verification
- Forwarding not enabled: Ensure checkbox is checked after verification
- Emails not forwarding: Try disabling and re-enabling forwarding
ProtonMail
Step-by-Step Guide: ProtonMail doesn’t support traditional forwarding, but you can use filters:-
Access ProtonMail Settings:
- Log in to ProtonMail
- Click Settings (gear icon)
- Go to “Filters” section
-
Create Custom Filter:
- Click “Add filter” or “Add sieve filter”
- Name: “Forward to ZappWay”
- Conditions: Apply to all incoming mail (or specific criteria)
-
Set Filter Action:
- Action: “Forward”
- Forward to:
inbox-xxxxx@mail.zappway.ai - Option: Keep copy in ProtonMail (recommended)
- Save filter
- You may need to manually forward important emails
- Consider using ProtonMail Bridge for advanced setups
- Contact ProtonMail support for business forwarding options
Other Email Providers
General Steps for Any Provider: Most email providers follow a similar process. Here’s a general guide:-
Find Settings:
- Look for Settings, Options, or Preferences
- Usually accessed via gear icon (⚙️) or menu (☰)
-
Locate Forwarding Option:
- Find “Forwarding”, “Auto-forward”, or “Mail forwarding”
- Usually under Mail, Inbox, or Advanced settings
- May be called “Email forwarding” or “Forward email”
-
Add Forwarding Address:
- Enter ZappWay forwarding address
- Format:
inbox-xxxxx@mail.zappway.ai - Copy exactly from ZappWay (no extra spaces)
-
Verify if Required:
- Some providers require email verification
- Check ZappWay inbox for verification email
- Click verification link or enter code
- Return to provider settings
-
Enable and Save:
- Enable/activate forwarding option
- Choose to keep copy (recommended)
- Save changes
- Test with sample email
- Zoho Mail: Settings → Mail → Filters → Forwarding
- FastMail: Settings → Rules → Forwarding
- iCloud Mail: Settings → Forwarding (web only)
- AOL Mail: Options → Mail Settings → Forwarding
- GMX Mail: Settings → POP3 & Forwarding
-
Search Provider Documentation:
- Search: “[Provider Name] email forwarding setup”
- Look for official help articles
- Check video tutorials if available
-
Contact Provider Support:
- Reach out to your email provider’s support team
- Ask about email forwarding capabilities
- Request step-by-step instructions
-
Contact ZappWay Support:
- Email: support@zappway.ai
- Include: Email provider name, any error messages
- We’ll help troubleshoot or provide guidance
7. Troubleshooting
Issue 1: Emails Not Being Forwarded
Problem: Emails sent to business address don’t appear in ZappWay inbox Symptoms:- No emails showing in ZappWay inbox
- AI not responding to emails
- Forwarding seems inactive or not working
- Email ZappWay support: support@zappway.ai
- Include: Email provider name, forwarding address, screenshots
- Describe steps you’ve already tried
- We’ll help troubleshoot the specific issue
Issue 2: AI Not Responding to Emails
Problem: Emails are received in ZappWay but AI doesn’t generate responses Symptoms:- Emails appear in ZappWay inbox view
- No automatic AI replies being sent
- Manual responses would work, but automatic don’t
Issue 3: Slow Response Times
Problem: AI takes too long to respond to emails Symptoms:- Responses take several minutes (5+ minutes)
- Inconsistent response times
- Some emails get quick responses, others very slow
- Timeout errors in logs (if visible)
Issue 4: Duplicate Responses
Problem: Recipients receive multiple copies of the same AI response Symptoms:- Same email sent 2, 3, or more times
- Recipients complain about duplicates
- Email logs show multiple sends for one inquiry
Issue 5: Emails Going to Recipient’s Spam
Problem: AI responses are marked as spam by recipients Symptoms:- Recipients don’t see responses
- Responses found in spam/junk folders
- Complaints about missing replies
- Low email deliverability rate
- Emails are sent from @mail.zappway.ai domain
- You cannot currently use custom sender domain
- This may affect deliverability for some recipients
- Custom sender verification is not yet available
- Sending from your own domain
- Better deliverability
- SPF/DKIM configuration
- Professional appearance
Issue 6: Cannot Access Email Inbox Settings
Problem: Cannot open or access inbox settings/configuration Symptoms:- Settings button doesn’t work
- Page doesn’t load
- Error messages when accessing settings
- Blank or frozen settings page
8. Best Practices
AI Configuration Best Practices
Create Email-Specific AI Employees: Don’t use generic AI Employees for email. Create specialized ones: Good Email AI Configuration:Response Quality Guidelines
Anatomy of a Great Email Response: 1. Personalized GreetingKnowledge Base Organization
Organize Knowledge by Inbox Purpose: Customer Support Inbox:Content Maintenance
Keep Knowledge Current: Weekly Tasks:- ✓ Accurate and up-to-date
- ✓ Clear and well-formatted
- ✓ Properly titled and categorized
- ✓ Free of broken links
- ✓ Relevant to customer needs
- ✓ Easy for AI to parse and understand
Email Signature Best Practices
Professional Signature Template:- Team or department name
- Company name
- Website URL
- Support contact email
- Help resources link
- AI disclosure (optional but recommended)
- Personal names (unless assigned human agent)
- Too many links (looks spammy)
- Large images or logos
- Excessive formatting
- Promotional content in every email
- Outdated contact information
Testing Strategy
Before Going Live: 1. Test Email Flow- Test weekly with sample emails
- Monitor real customer interactions
- Gather feedback from team
- Adjust based on results
- Document issues and solutions
📞 Support & Resources
Getting Help
ZappWay Support:- Email: support@zappway.ai
- Live Chat: Available in dashboard
- Response Time: Within 24 hours
- Email inbox alias or ID
- Description of issue
- Screenshots if applicable
- Email examples (remove sensitive data)
- Steps you’ve already tried
- Error messages received
- ZappWay Documentation
- AI Employee Configuration Guide
- Knowledge Base Setup
- Email Inbox Guides
- API Documentation
Community & Feedback
Community:- User forum (coming soon)
- Slack community (request access)
- Monthly webinars
- User case studies
- Feature requests: Via dashboard feedback button
- Bug reports: support@zappway.ai
- Success stories: Share with our team!
- Improvement suggestions: Always welcome
✅ Quick Reference
Setup Checklist
Essential Actions Reference
Common Commands
Gmail Forwarding:Troubleshooting Quick Guide
Support Contact Quick Reference
Last Updated: March 2026
Platform: ZappWay Email Inbox
Additional Notes
Future Features (Coming Soon)
- Custom Domain Sending: Send from your own domain
- Email Verification System: SPF/DKIM configuration
- Advanced Routing: Intelligent email categorization
- Email Templates: Pre-built response templates
- Analytics Dashboard: Detailed email performance metrics
- A/B Testing: Test different AI configurations
- Sentiment Analysis: Track customer satisfaction
- Multi-language Auto-detection: Automatic language switching
- Integration with CRM: Sync with Salesforce, HubSpot, etc.
Changelog
Version 1.0 (March 2026):- Initial email inbox feature
- Email forwarding setup
- AI Employee integration
- Knowledge base support
- Multi-inbox management
- Comprehensive documentation
Thank you for using ZappWay Email Inbox! For questions, feedback, or support, contact us at support@zappway.ai