Important: Email inboxes work by forwarding your business emails to ZappWay. Your AI Employees automatically respond based on their assigned knowledge and instructions. Currently, emails are sent from [email protected].

🔢 Table of Contents

  1. Overview
  2. Prerequisites
  3. Getting Started
  4. Available Features
  5. Common Use Cases
  6. Email Provider Setup
  7. Troubleshooting
  8. Best Practices

1. Overview

What is Email Inbox?

Email Inbox allows you to automate email responses using AI. Forward emails from your business address to ZappWay, and your AI Employee will automatically process and respond to them based on their knowledge base and instructions.

Key Features

  • Email Forwarding: Simple setup with any email provider
  • AI-Powered Responses: Intelligent replies based on your knowledge base
  • Multiple Inboxes: Create separate inboxes for different purposes
  • Knowledge Integration: Connect datastores and datasources for context
  • AI Employee Assignment: Assign specific AI Employees to handle emails
  • Status Dashboard: View assigned AI and connected knowledge sources
  • 24/7 Automation: Never miss an email, even outside business hours

How It Works

Customer Email → Your Business Email → Forwarded to ZappWay → AI Processes → AI Responds
Example Flow:
  1. Customer sends email to [email protected]
  2. Your email provider forwards it to your ZappWay inbox
  3. AI Employee reads the email and searches assigned knowledge base
  4. AI generates appropriate response
  5. Reply is sent from [email protected]

What You Can Do

With Email Inbox:
  • Automate customer support responses
  • Qualify sales leads automatically
  • Handle FAQ inquiries 24/7
  • Provide instant responses to common questions
  • Reduce support team workload
  • Scale email operations efficiently

Current Limitations

Important to Know:
  • ⚠️ Emails are sent from [email protected] (not custom domain)
  • ⚠️ No custom sender verification available yet
  • ⚠️ Basic email forwarding only (no advanced routing)
Coming Soon:
  • Custom domain sender addresses
  • Email verification system
  • Advanced routing and filtering
  • Email templates
  • Analytics dashboard

2. Prerequisites

Before You Begin

Required:
  • Active ZappWay account
  • Existing business email address (e.g., [email protected])
  • Access to email provider settings (for forwarding setup)
  • At least one AI Employee created in your organization
Recommended:
  • Knowledge base (datastores/datasources) prepared
  • Clear use case for email automation
  • Test email account for initial setup

Email Provider Access

You’ll need access to:
  • Email forwarding settings
  • Admin account if using company email
  • Ability to configure forwarding rules
Supported Email Providers:
  • Gmail / Google Workspace
  • Outlook / Microsoft 365
  • Yahoo Mail
  • ProtonMail
  • Any provider with forwarding capability

AI Employee Requirements

Your AI Employee should have:
  • Clear instructions for email responses
  • Connected knowledge base (datastores/datasources)
  • Appropriate tone and style guidelines
  • Escalation rules if needed
Tip: Create AI Employees specifically for email:
  • Concise response style
  • Professional tone
  • Clear escalation guidelines
  • Email-specific formatting

3. Getting Started

Quick Setup (10 Minutes)

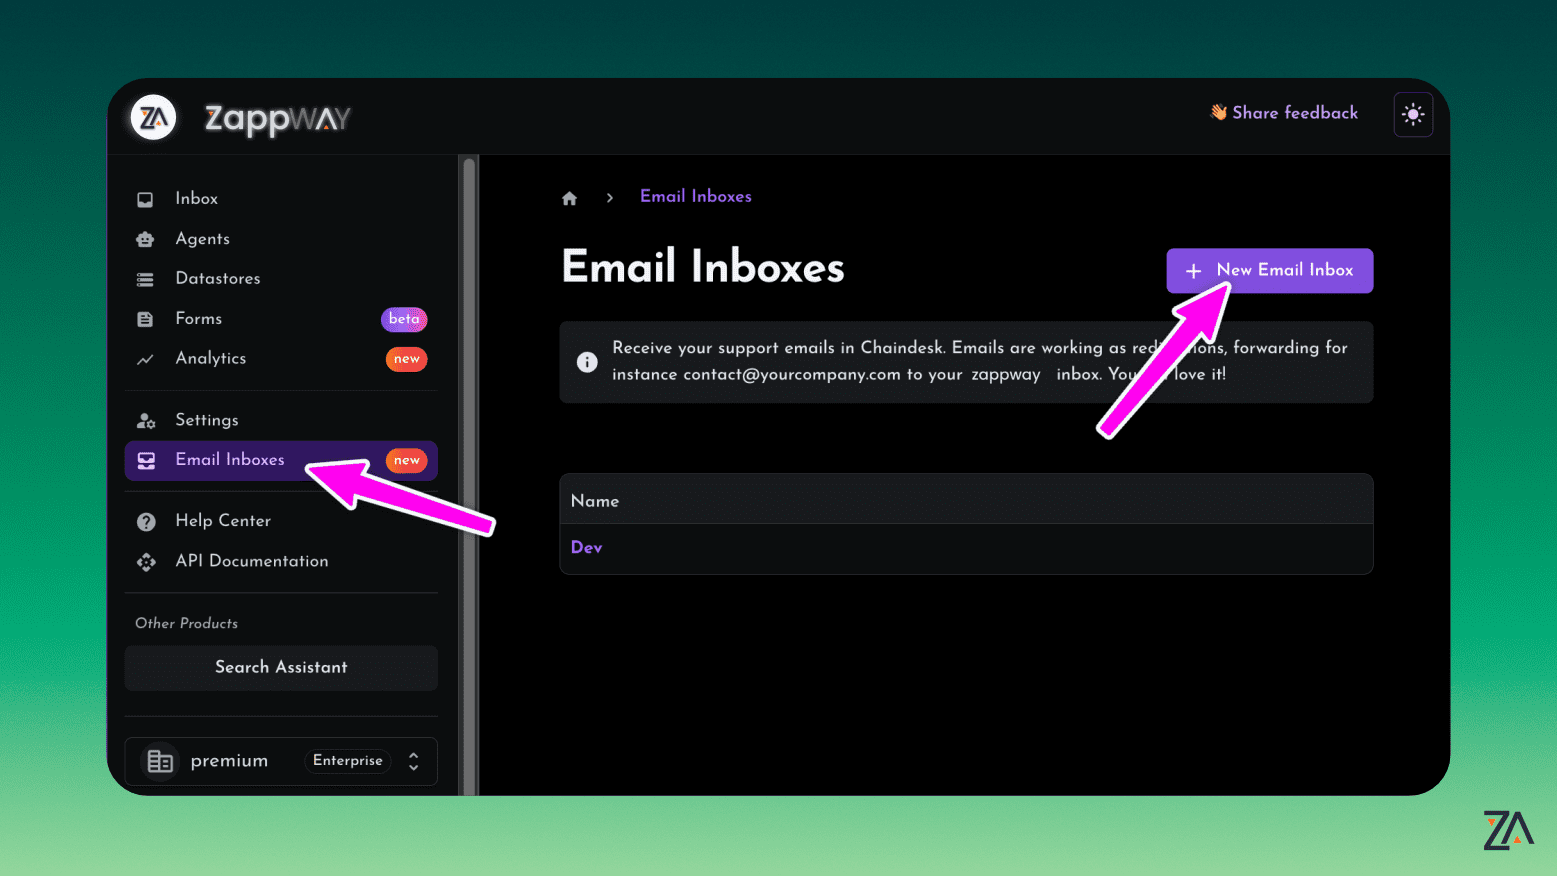
Follow these steps to set up your first email inbox:

Step 1: Create Email Inbox

  1. Log in to your ZappWay dashboard
  2. Navigate to Email Inboxes from the left sidebar
  3. Click “Create New Inbox” or “New Email Inbox” button
Create new email inbox

Step 2: Configure Inbox Name

Enter Inbox Name:
  • Provide a descriptive name for your inbox
  • This name is for your internal organization only
  • Examples: “Customer Support Inbox”, “Sales Inquiries”, “General Info”
Naming Best Practices:
  • Use clear, descriptive names
  • Include department or purpose
  • Consider adding language (e.g., “Support - EN”, “Suporte - PT”)
  • Avoid generic names like “Inbox 1”
System Generates Forwarding Address: After creating the inbox, the system automatically generates your unique forwarding address: This address is where you’ll forward your business emails.

Step 3: Enable AI Responses

Activate AI Toggle:
  1. In the inbox Settings tab, find the “Activate AI” toggle
  2. Switch the toggle to ON (enabled state)
  3. The AI configuration section will expand below
Why Enable AI:
  • Without AI enabled, emails are received but not responded to
  • AI must be active for automatic responses
  • You can disable AI temporarily without deleting the inbox

Step 4: Select AI Employee

Choose from Existing AI Employees:
  1. Click the AI Employee dropdown selector
  2. Browse or search your existing AI Employees
  3. Select the appropriate AI Employee for this inbox
Or Create New AI Employee:
  1. Click ”+ Create AI Employee” option in dropdown
  2. A modal form will open
  3. Fill in the AI Employee details:
    • Name: Descriptive name
    • Instructions: Detailed behavior guidelines
    • Tools: Enable necessary tools
    • Model Settings: Configure model preferences
  4. Click “Create” to save
  5. The new AI Employee is automatically assigned to the inbox
AI Employee Configuration Tips: For email responses, configure your AI Employee with:
Instructions Example:

You are a customer support representative responding to emails.

Response Guidelines:
- Greet customers professionally by name
- Answer questions using the knowledge base
- Provide clear, step-by-step solutions
- Include relevant documentation links
- Be empathetic and understanding
- Keep responses concise (3-5 paragraphs max)
- Use bullet points for lists
- End with offer to help further

Escalation:
- Escalate to human if customer is frustrated
- Escalate complex technical issues
- Escalate refund requests over $100

Tone: Professional, friendly, helpful
Format: Well-structured with paragraphs and bullet points

Step 5: Add Knowledge Sources (Optional)

Why Add Knowledge: Knowledge sources provide context and accurate information for AI responses:
  • Datastores: Collections of documents (help docs, FAQs, policies)
  • Datasources: Individual files (product manuals, guides)
How to Add Knowledge:
  1. In the AI configuration section, find the Knowledge selector
  2. Click to open the knowledge picker modal
  3. Search and Select:
    • Type to search available datastores and datasources
    • Click to select one or multiple items
    • Selected items appear as chips
  4. Click “Select” or “Save” to confirm
Knowledge Organization Tips: Customer Support Inbox:
Datastores:
- Help Documentation
- FAQ Database
- Troubleshooting Guides

Datasources:
- Product Manual
- Common Issues & Solutions
Sales Inbox:
Datastores:
- Product Catalog
- Pricing Information
- Case Studies

Datasources:
- Sales Scripts
- Objection Handlers

Step 6: Save Configuration

  1. After selecting AI Employee and knowledge sources
  2. Click the “Save” or “Select” button
  3. Configuration is saved immediately
Status Panel Appears: After saving, you’ll see a status panel showing:
  • Inbox Name: Your configured name
  • Assigned AI Employee: Name and unique ID
  • Connected Datastores: List of datastores (if any)
  • Connected Datasources: List of datasources (if any)
Example Status Display:
┌─────────────────────────────────────┐
│ Inbox Settings                      │
├─────────────────────────────────────┤
│ Name: Customer Support Inbox        │
│ AI Employee: Support Bot            │
│ AI Employee ID: ai_abc123def456     │
│ Datastores: Help Docs, FAQ          │
│ Datasources: Product Manual         │
└─────────────────────────────────────┘

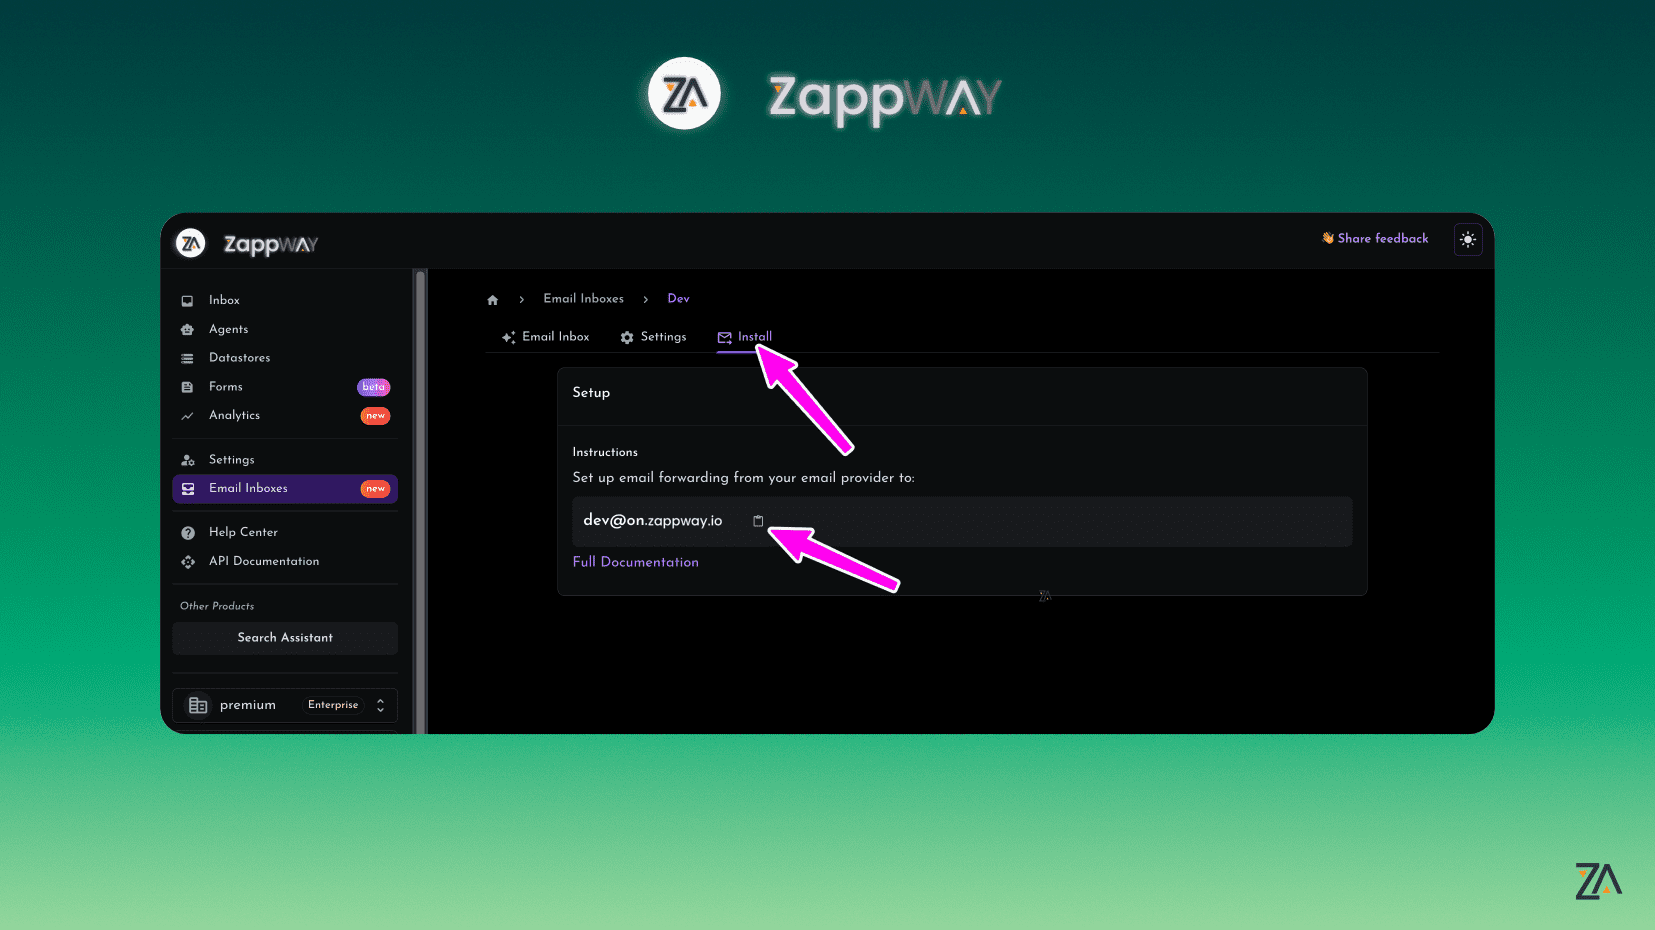
Step 7: Set Up Email Forwarding

Get Your Forwarding Address:
  1. Navigate to the “Install” or “Forwarding” tab in your inbox
  2. Copy the displayed forwarding address
    • Format: [your-alias]@mail.zappway.ai
    • This is unique to your inbox
Copy forwarding address Configure Your Email Provider:
  1. Log in to your email provider (Gmail, Outlook, etc.)
  2. Go to email forwarding settings
  3. Add the ZappWay forwarding address
  4. Enable forwarding and save
Detailed provider-specific instructions are in Section 6: Email Provider Setup

Step 8: Test Your Setup

Send Test Email:
  1. From another email account, send a test email to your business email
  2. Subject: “Test”
  3. Body: “This is a test email to verify the inbox is working.”
Verify Each Step:
Testing Checklist:
✓ Email received in ZappWay inbox (check inbox view)
✓ AI processes the email (may take 5-30 seconds)
✓ AI generates response (check content is appropriate)
✓ Response sent successfully
✓ Response appears in sender's inbox
✓ Response is from [email protected]
✓ Response content is accurate and helpful
✓ Knowledge base information is used correctly
What to Check:
  1. In ZappWay:
    • Check inbox view for received email
    • Verify AI response was generated
    • Review response quality
  2. In Test Email Account:
    • Check for response email
    • Verify sender address ([email protected])
    • Review response content
    • Check formatting is proper
If Issues:
  • Wait 2-3 minutes (processing can take time)
  • Check spam/junk folders
  • Verify forwarding is enabled
  • Review troubleshooting section below
Adjust if Needed: If test response isn’t ideal:
  1. Go back to inbox Settings
  2. Modify AI Employee instructions
  3. Add or adjust knowledge sources
  4. Save changes
  5. Test again

4. Available Features

Feature 1: Email Inbox Management

Create and manage multiple email inboxes for different purposes from a centralized dashboard. What You Can Do: Create Inboxes:
  • Set up unlimited inboxes (based on plan)
  • Assign unique names for easy identification
  • Each inbox gets unique forwarding address
  • Independent AI and knowledge configuration
View Inboxes:
  • See all inboxes in one dashboard
  • Monitor inbox status and activity
  • Quick access to settings
  • View assigned AI and knowledge
Manage Inboxes:
  • Update inbox names
  • Change AI Employee assignments
  • Modify knowledge base connections
  • Enable/disable AI responses
  • Delete unused inboxes
Inbox List View: The main Email Inboxes page displays all your inboxes with:
  • Inbox Name: Your custom identifier
  • Forwarding Address: Unique inbound address
  • AI Status: Active/Inactive indicator
  • Assigned AI: Name of AI Employee
  • Action Buttons: Settings, View Messages, Delete
Example Inbox Card:
┌─────────────────────────────────────┐
│ Customer Support Inbox              │
├─────────────────────────────────────┤
│ Forward to:                         │
[email protected]
│                                     │
│ AI Status: Active                   │
│ AI Employee: Support Bot            │
│                                     │
│ [Settings] [Messages] [Delete]      │
└─────────────────────────────────────┘

Feature 2: AI Employee Assignment

Assign specialized AI Employees to handle different types of emails for each inbox. Why Assign AI Employees: Each inbox can have its own AI Employee to:
  • Handle specific types of inquiries
  • Use relevant knowledge bases
  • Apply appropriate tone and style
  • Follow department-specific processes
  • Scale operations efficiently
Assignment Process: Option 1: Select Existing AI Employee
  1. Open inbox Settings
  2. Enable “Activate AI” toggle
  3. Click AI Employee dropdown
  4. Select from your organization’s AI Employees
  5. Save configuration
Option 2: Create New AI Employee
  1. Open inbox Settings
  2. Enable “Activate AI” toggle
  3. Click ”+ Create AI Employee” in dropdown
  4. Fill in creation form:
    • General settings (name, description, instructions)
    • Tools configuration
    • Model and prompt settings
  5. Click “Create”
  6. AI Employee is automatically assigned to inbox
AI Employee Configuration Panel: When you select or create an AI Employee, you can configure:
  • Instructions: Detailed behavior guidelines
  • Knowledge: Connected datastores and datasources
  • Tools: Enable specific integrations
  • Model Settings: Temperature, token limits, etc.
Updating AI Assignment: To change the AI Employee:
  1. Go to inbox Settings
  2. Select different AI Employee from dropdown
  3. Adjust knowledge sources if needed
  4. Save changes
  5. New configuration takes effect immediately
Multiple AI Strategies: You can assign different AI Employees for:
  • Different languages: English support vs Portuguese support
  • Different functions: Sales vs Support vs General info
  • Different expertise levels: Tier 1 vs Tier 2 support
  • Different tones: Formal vs casual

Feature 3: Knowledge Base Integration

Connect datastores and datasources to provide AI with context and information for accurate responses. What is Knowledge: Datastores:
  • Collections of multiple documents
  • Organized by topic or category
  • Examples: Help documentation, FAQ database, product manuals
  • Suitable for broad knowledge areas
Datasources:
  • Individual documents or data sources
  • More focused and specific
  • Examples: Single PDF, specific guide, latest policy
  • Suitable for specific information
Why Add Knowledge: Benefits:
  • Accuracy: AI uses your actual documentation
  • Consistency: Same correct information every time
  • Currency: Update knowledge to reflect latest changes
  • Expertise: AI becomes expert in your domain
  • Reduced Errors: Less hallucination and incorrect info
How Knowledge is Used:
  1. Email Received: Customer sends question
  2. AI Searches Knowledge: Semantic search across connected sources
  3. AI Finds Information: Retrieves most relevant content
  4. AI Generates Response: Uses found information to answer
  5. AI Cites Sources: References documents when appropriate
  6. Response Sent: Email with accurate information
Adding Knowledge to Inbox:
  1. Go to inbox Settings tab
  2. Find the Knowledge selector section
  3. Click to open knowledge picker
  4. Search for datastores or datasources by name
  5. Select one or multiple items
  6. Selected items appear as chips
  7. Click “Save” to apply
Knowledge Selector Features:
  • Multi-select: Choose multiple datastores and datasources
  • Search functionality: Type to filter available items
  • Grouped by type: Datastores and datasources separated
  • Visual feedback: Selected items shown as removable chips
  • Easy removal: Click X on chip to remove selection
Knowledge Display: After saving, the status panel shows:
Datastores: Help Docs, FAQ, Policies
Datasources: Product Manual v2.0, Quick Start Guide
Editing Knowledge: To modify connected knowledge:
  1. Go to inbox Settings
  2. Click knowledge selector
  3. Add new items or remove existing ones
  4. Click “Save”
  5. Changes take effect immediately
Knowledge Best Practices: Do:
  • Keep knowledge current and updated
  • Use clear, well-organized documents
  • Include common questions and answers
  • Test AI responses after updates
  • Remove outdated information
  • Organize by topic or department
Don’t:
  • Overload with too many sources (slows responses)
  • Mix unrelated topics in same inbox
  • Leave outdated policies or information
  • Forget to update after product changes
  • Use unclear or poorly formatted documents
Example Knowledge Structure: Support Inbox:
Datastores:
✓ Help Documentation (general guides)
✓ FAQ Database (common questions)
✓ Troubleshooting Guides (problem-solving)

Datasources:
✓ Product Manual v2.0 (technical specs)
✓ Quick Start Guide (getting started)
✓ Latest Release Notes (new features)
Sales Inbox:
Datastores:
✓ Product Catalog (all products)
✓ Pricing Information (current prices)
✓ Case Studies (success stories)

Datasources:
✓ Sales Scripts (conversation templates)
✓ Objection Handlers (common objections)
✓ ROI Calculator Guide (value demonstration)

Feature 4: Activate AI Toggle

Control when AI automatically responds to emails with a simple on/off switch. What It Does: The “Activate AI” toggle allows you to:
  • Enable or disable automatic AI responses
  • Keep inbox active without AI intervention
  • Manually control when AI should respond
  • Test configurations before going live
Toggle States:
StateBehaviorWhen to Use
ONAI automatically responds to all incoming emailsNormal operation
OFFEmails are received but AI doesn’t respondTesting, maintenance, manual handling
Use Cases for Disabling AI: Temporary Disable:
  • Testing new configuration
  • During system maintenance
  • When you want manual responses only
  • Troubleshooting issues
Permanent Disable:
  • Inbox used only for receiving (not responding)
  • Manual review before AI response
  • Backup inbox without automation
How to Use: Enable AI:
  1. Go to inbox Settings
  2. Find “Activate AI” toggle
  3. Switch to ON position
  4. Configure AI Employee and knowledge
  5. Save configuration
Disable AI:
  1. Go to inbox Settings
  2. Find “Activate AI” toggle
  3. Switch to OFF position
  4. Configuration is saved but not used
  5. Emails still received, just not responded to
Important Notes:
  • Disabling AI doesn’t delete configuration
  • You can re-enable without reconfiguring
  • Emails are still received when disabled
  • Perfect for testing before going live

Feature 5: Inbox Status Dashboard

View real-time status and configuration of each email inbox from the main dashboard. What You See: For Each Inbox:
  • Inbox Name: Your custom identifier
  • Forwarding Address: Where to send emails
  • AI Status: Active or Inactive
  • Assigned AI Employee: Name and ID
  • Connected Knowledge: Datastores and datasources count
  • Recent Activity: Last email received (if available)
Dashboard Actions: Quick Actions Available:
  • Settings: Modify inbox configuration
  • View Messages: See received emails
  • Delete: Remove inbox permanently
Status Indicators:
IndicatorMeaningWhat to Do
AI: ActiveAI is responding to emailsNormal operation
AI: InactiveAI is disabledEnable in Settings if needed
No AI AssignedNo AI Employee selectedAssign AI Employee
No KnowledgeNo knowledge sources connectedAdd datastores/datasources
Monitoring Features: At a Glance:
  • See all inboxes in one view
  • Quick status check for each
  • Identify configuration issues
  • Access settings quickly
No Real-time Updates:
  • Dashboard shows saved configuration
  • Refresh page to see latest status
  • No automatic updates currently

5. Common Use Cases

Use Case 1: Customer Support Automation

Scenario: Provide instant responses to customer support emails 24/7. Setup: Create Inbox: Configure AI Employee:
Name: Support Bot

Instructions:
You are a helpful customer support representative for [Company Name].

Response Guidelines:
- Greet customers professionally by name
- Answer questions using the knowledge base
- Provide clear, step-by-step solutions
- Include relevant documentation links
- Be empathetic and understanding
- Keep responses concise (3-5 paragraphs)
- Use bullet points for lists
- Escalate complex issues to human agents

Escalation Rules:
- Customer is frustrated or angry
- Technical issue requires engineering
- Refund requests over $100
- Security or privacy concerns
- Explicit request for human agent

Response Format:
1. Greeting with customer name
2. Acknowledge their issue
3. Provide solution or answer
4. Include helpful resources
5. Offer additional help
6. Professional closing

Tone: Professional, friendly, helpful
Add Knowledge:
  • Datastore: “Help Documentation”
  • Datastore: “FAQ Database”
  • Datastore: “Troubleshooting Guides”
  • Datasource: “Product Manual”
  • Datasource: “Common Issues & Solutions”
Benefits:
  • Instant responses (even at 3 AM)
  • Consistent, accurate information
  • Reduced support ticket volume
  • Better customer satisfaction
  • Support team focuses on complex issues
  • Scale support without hiring
Example Interaction: Customer Email:
To: [email protected]
Subject: How do I reset my password?

Hi,

I forgot my password and can't log in to my account. 
Can you help me reset it?

Thanks,
John Smith
AI Response:
From: [email protected]
To: [email protected]
Subject: Re: How do I reset my password?

Hi John,

I'd be happy to help you reset your password!

Here's how to reset it:

1. Go to our login page at www.company.com/login
2. Click on "Forgot Password?" below the login button
3. Enter your email address ([email protected])
4. Check your email for a password reset link
5. Click the link and create a new password

The reset link will expire in 24 hours for security reasons.

If you don't receive the email within 5 minutes, please:
• Check your spam/junk folder
• Verify you're using the correct email address
• Reply to this email if the issue persists

You can find more information in our Help Center:
https://help.company.com/password-reset

Is there anything else I can help you with?

Best regards,
Customer Support Team

Use Case 2: Lead Qualification

Scenario: Automatically qualify sales leads from email inquiries. Setup: Create Inbox: Configure AI Employee:
Name: Lead Qualifier Bot

Instructions:
You qualify sales leads from email inquiries for [Company Name].

Qualification Process:
1. Thank prospect for reaching out
2. Ask qualifying questions if info is missing:
   - Company name and size
   - Industry
   - Budget range
   - Timeline for implementation
   - Decision-making authority
   - Specific needs or pain points
3. Provide relevant product information
4. Assess lead quality
5. Offer next steps (demo, call, resources)

Lead Scoring:
Hot Lead (9-10):
- Budget: $10,000+/month or enterprise
- Timeline: Immediate (within 1 month)
- Authority: Decision maker (C-level, VP)
- Need: Clear pain point we solve
- Action: Offer immediate demo scheduling

Warm Lead (6-8):
- Budget: $5,000-$10,000/month
- Timeline: 1-3 months
- Authority: Influencer or manager
- Need: Some pain point we address
- Action: Provide resources + follow-up call

Cold Lead (1-5):
- Budget: Under $5,000/month or unclear
- Timeline: 3+ months or just researching
- Authority: Individual contributor or researcher
- Need: Vague or doesn't match our solution
- Action: Newsletter signup + nurture sequence

Response Strategy:
- Be professional and consultative
- Ask clarifying questions politely
- Provide value in every response
- Don't be pushy or salesy
- Focus on understanding needs
- Offer appropriate next steps

Tone: Professional, enthusiastic, consultative
Add Knowledge:
  • Datastore: “Product Catalog”
  • Datastore: “Pricing Information”
  • Datastore: “Case Studies”
  • Datastore: “Competitive Analysis”
  • Datasource: “Sales Scripts”
  • Datasource: “Objection Handlers”
  • Datasource: “ROI Calculator Guide”
Benefits:
  • Immediate lead response (no delays)
  • Consistent qualification process
  • Better lead prioritization
  • More efficient sales team
  • Higher conversion rates
  • 24/7 lead capture
  • No leads slip through cracks

Use Case 3: General Information Requests

Scenario: Handle general inquiries about company, services, and contact information. Setup: Create Inbox: Configure AI Employee:
Name: Info Bot

Instructions:
You provide general information about [Company Name] to inquiries.

Topics You Handle:
- Company overview and history
- Services and offerings
- Contact information
- Office locations and hours
- General questions about the business
- Directions to correct department

Response Guidelines:
- Be welcoming and informative
- Provide clear, accurate information
- Include relevant links
- Direct to appropriate department if needed
- Keep responses concise but complete

Department Routing:
- Technical questions → [email protected]
- Sales inquiries → [email protected]
- Partnership inquiries → [email protected]
- Press inquiries → [email protected]
- Career questions → [email protected]

Tone: Professional, friendly, welcoming
Add Knowledge:
  • Datastore: “Company Information”
  • Datastore: “Services Overview”
  • Datasource: “Contact Directory”
  • Datasource: “Office Locations”
  • Datasource: “FAQ - General”
Benefits:
  • Instant information provision
  • Proper routing to departments
  • Reduced general inquiry load
  • Better first impression
  • Consistent company information

6. Email Provider Setup

Gmail / Google Workspace

Step-by-Step Guide:
  1. Access Gmail Settings:
    • Open Gmail in your web browser
    • Click the gear icon (⚙️) in the top right corner
    • Select “See all settings”
  2. Navigate to Forwarding:
    • Click the “Forwarding and POP/IMAP” tab at the top
    • Find the “Forwarding” section
  3. Add Forwarding Address:
    • Click “Add a forwarding address” button
    • Enter your ZappWay forwarding address:
    • Click “Next”
    • Click “Proceed” in the confirmation dialog
  4. Verify Forwarding:
    • Google sends a confirmation email to the ZappWay address
    • ZappWay automatically confirms this (no action needed from you)
    • Wait 1-2 minutes for the verification to complete
    • Refresh your Gmail settings page
  5. Enable Forwarding:
    • Once verified, select “Forward a copy of incoming mail to”
    • Choose your ZappWay address from the dropdown
    • Select what happens to Gmail’s copy:
      • “Keep Gmail’s copy in the Inbox” (recommended) ✓
      • “Mark Gmail’s copy as read”
      • “Archive Gmail’s copy”
      • “Delete Gmail’s copy”
    • Click “Save Changes” at the bottom
Recommended Settings:
✓ Forward a copy of incoming mail to: [email protected]
✓ Keep Gmail's copy in the Inbox
Why Keep Copy in Inbox:
  • You can still see all emails
  • Human agents can access if needed
  • Backup in case of issues
  • Audit trail maintained
Testing Gmail Forwarding:
  1. Send a test email to your Gmail address
  2. Check that a copy appears in Gmail inbox
  3. Check that copy appears in ZappWay inbox (may take 1-2 minutes)
  4. Verify AI responds appropriately
  5. Confirm response is sent from [email protected]
Troubleshooting Gmail:
  • Verification doesn’t complete: Wait 5 minutes and refresh page
  • Forwarding address not copying correctly: Ensure no extra spaces
  • Emails not forwarding: Check forwarding is enabled (not disabled)
  • Delays in forwarding: Normal, can take 1-3 minutes

Outlook / Microsoft 365

Step-by-Step Guide:
  1. Access Outlook Settings:
    • Open Outlook.com or Outlook web app
    • Click the gear icon (⚙️) in the top right for Settings
    • Select “View all Outlook settings” at the bottom
  2. Navigate to Forwarding:
    • In the left sidebar, click “Mail”
    • Select “Forwarding” from the submenu
  3. Enable Forwarding:
    • Check the box “Enable forwarding”
    • In the text field, enter your ZappWay forwarding address:
    • Check “Keep a copy of forwarded messages” (recommended)
    • Click “Save” at the top
Recommended Settings:
✓ Enable forwarding: Checked
✓ Forward my email to: [email protected]
✓ Keep a copy of forwarded messages: Checked
Testing Outlook Forwarding:
  1. Send a test email to your Outlook address
  2. Verify copy stays in Outlook inbox
  3. Check that copy appears in ZappWay (may take 2-3 minutes)
  4. Confirm AI response is generated
  5. Verify response is sent from [email protected]
Troubleshooting Outlook:
  • Forwarding not working: Ensure checkbox is checked (enabled)
  • Address not accepting: Verify no typos in forwarding address
  • Delayed forwarding: Normal for Outlook, can take 2-5 minutes
  • Changes not saving: Try different browser or clear cache
Important Note for Microsoft 365: If using Microsoft 365 (business account):
  • You may need admin permissions to enable forwarding
  • Some organizations disable forwarding for security
  • Contact your IT administrator if forwarding option is unavailable
  • Consider using email rules as alternative if forwarding blocked

Yahoo Mail

Step-by-Step Guide:
  1. Access Yahoo Settings:
    • Log in to Yahoo Mail
    • Click the gear icon (⚙️) in the top right corner
    • Select “More Settings” from the dropdown
  2. Navigate to Forwarding:
    • In the left menu, click “Mailboxes”
    • Select your email address from the list
    • Scroll down to the “Forwarding” section
  3. Add Forwarding Address:
    • In the forwarding field, enter your ZappWay address:
    • Select “Store and forward” (keeps copy in Yahoo)
    • Click “Verify” button
  4. Confirm Verification:
    • Yahoo sends a verification email to the ZappWay address
    • Check your ZappWay inbox for the verification email
    • Click the verification link in the email
    • Return to Yahoo Mail settings page
  5. Enable Forwarding:
    • After verification, the forwarding section updates
    • Check the “Enable automatic forwarding” box
    • Ensure “Store and forward” is still selected
    • Click “Save” button
Recommended Settings:
✓ Enable automatic forwarding: Checked
✓ Forward to: [email protected]
✓ Store and forward: Selected (keeps copy in Yahoo)
Testing Yahoo Forwarding:
  1. Send test email to your Yahoo address
  2. Verify copy remains in Yahoo inbox
  3. Check ZappWay inbox for forwarded copy (2-3 minutes)
  4. Confirm AI generates response
  5. Check response is sent properly
Troubleshooting Yahoo:
  • Verification email not received: Check ZappWay inbox and spam
  • Verification link expired: Request new verification
  • Forwarding not enabled: Ensure checkbox is checked after verification
  • Emails not forwarding: Try disabling and re-enabling forwarding

ProtonMail

Step-by-Step Guide: ProtonMail doesn’t support traditional forwarding, but you can use filters:
  1. Access ProtonMail Settings:
    • Log in to ProtonMail
    • Click Settings (gear icon)
    • Go to “Filters” section
  2. Create Custom Filter:
    • Click “Add filter” or “Add sieve filter”
    • Name: “Forward to ZappWay”
    • Conditions: Apply to all incoming mail (or specific criteria)
  3. Set Filter Action:
    • Action: “Forward”
    • Forward to: [email protected]
    • Option: Keep copy in ProtonMail (recommended)
    • Save filter
Alternative: Auto-Reply + Manual Forwarding: Since ProtonMail focuses on privacy and encryption:
  • You may need to manually forward important emails
  • Consider using ProtonMail Bridge for advanced setups
  • Contact ProtonMail support for business forwarding options

Other Email Providers

General Steps for Any Provider: Most email providers follow a similar process. Here’s a general guide:
  1. Find Settings:
    • Look for Settings, Options, or Preferences
    • Usually accessed via gear icon (⚙️) or menu (☰)
  2. Locate Forwarding Option:
    • Find “Forwarding”, “Auto-forward”, or “Mail forwarding”
    • Usually under Mail, Inbox, or Advanced settings
    • May be called “Email forwarding” or “Forward email”
  3. Add Forwarding Address:
    • Enter ZappWay forwarding address
    • Format: [email protected]
    • Copy exactly from ZappWay (no extra spaces)
  4. Verify if Required:
    • Some providers require email verification
    • Check ZappWay inbox for verification email
    • Click verification link or enter code
    • Return to provider settings
  5. Enable and Save:
    • Enable/activate forwarding option
    • Choose to keep copy (recommended)
    • Save changes
    • Test with sample email
Common Provider-Specific Links:
  • Zoho Mail: Settings → Mail → Filters → Forwarding
  • FastMail: Settings → Rules → Forwarding
  • iCloud Mail: Settings → Forwarding (web only)
  • AOL Mail: Options → Mail Settings → Forwarding
  • GMX Mail: Settings → POP3 & Forwarding
Need Help? If your email provider isn’t listed or you’re having trouble:
  1. Search Provider Documentation:
    • Search: “[Provider Name] email forwarding setup”
    • Look for official help articles
    • Check video tutorials if available
  2. Contact Provider Support:
    • Reach out to your email provider’s support team
    • Ask about email forwarding capabilities
    • Request step-by-step instructions
  3. Contact ZappWay Support:
    • Email: [email protected]
    • Include: Email provider name, any error messages
    • We’ll help troubleshoot or provide guidance

7. Troubleshooting

Issue 1: Emails Not Being Forwarded

Problem: Emails sent to business address don’t appear in ZappWay inbox Symptoms:
  • No emails showing in ZappWay inbox
  • AI not responding to emails
  • Forwarding seems inactive or not working
Solutions: 1. Verify Forwarding is Enabled
Steps:
1. Log in to your email provider (Gmail, Outlook, Yahoo, etc.)
2. Go to email forwarding settings
3. Check that forwarding toggle/checkbox is enabled
4. Verify ZappWay address is listed as forwarding destination
5. Ensure forwarding wasn't accidentally disabled
2. Check Forwarding Address is Correct
Correct format:
[email protected]

Common mistakes to avoid:
[email protected] (wrong domain, missing "mail")
✗ inbox-xxxxx@ mail.zappway.ai (extra space)
[email protected] (wrong extension)

How to fix:
1. Copy forwarding address from ZappWay inbox settings
2. Paste directly (don't type manually)
3. Remove existing forwarding rule
4. Add new rule with correct address
5. Save and test
3. Test with Simple Email
Steps:
1. From a different email account (not the forwarding one)
2. Send a simple test email:
   To: [email protected]
   Subject: Test
   Body: This is a test email
3. Wait 2-3 minutes for processing
4. Check ZappWay inbox for the email
5. If not received, proceed to next solutions
4. Check Email Provider Spam/Filters
Check these locations:
✓ Spam/Junk folder in your email provider
✓ Trash/Deleted items
✓ Other folders (Promotions, Updates, etc.)
✓ Email filters that might block forwarding
✓ Security rules that prevent external forwarding
5. Verify Email Provider Permissions
Confirm:
✓ Forwarding is not disabled by administrator
✓ Account has permission to forward externally
✓ No security policies blocking forwarding
✓ Account is not suspended or restricted
✓ Forwarding quota not exceeded (some providers have limits)
6. Re-setup Forwarding from Scratch
Complete reset:
1. Go to your email provider settings
2. Remove/delete existing forwarding rule
3. Wait 5 minutes
4. Copy forwarding address fresh from ZappWay
5. Add new forwarding rule with copied address
6. Enable forwarding
7. Save changes
8. Send new test email
9. Wait 3 minutes and check ZappWay inbox
7. Check Email Provider Status
Verify:
- Is your email provider experiencing outages?
- Check provider's status page
- Search social media for provider issues
- Try accessing web version of email
- If provider is down, wait for resolution
8. Contact Support If none of the above works:
  • Email ZappWay support: [email protected]
  • Include: Email provider name, forwarding address, screenshots
  • Describe steps you’ve already tried
  • We’ll help troubleshoot the specific issue

Issue 2: AI Not Responding to Emails

Problem: Emails are received in ZappWay but AI doesn’t generate responses Symptoms:
  • Emails appear in ZappWay inbox view
  • No automatic AI replies being sent
  • Manual responses would work, but automatic don’t
Diagnostic Checklist: 1. Check AI is Enabled
Steps:
1. Go to Email Inboxes page
2. Click "Settings" for the affected inbox
3. Find "Activate AI" toggle
4. Verify it's switched to ON (enabled)
5. If OFF, switch to ON
6. Save configuration
7. Send test email
2. Verify AI Employee is Assigned
Steps:
1. In inbox Settings
2. Check that an AI Employee is selected in dropdown
3. Ensure dropdown shows AI name (not "Select AI Employee")
4. If no AI selected:
   - Select appropriate AI Employee
   - Or create new one
   - Save configuration
5. Test with new email
3. Test AI Employee Directly
Steps:
1. Go to AI Employees page
2. Find and open the assigned AI Employee
3. Send a test message in the chat interface
4. Verify AI responds normally

If AI responds in chat:
→ Issue is with email integration (continue troubleshooting)

If AI doesn't respond in chat:
→ Issue is with AI configuration:
   - Check AI instructions are not empty
   - Verify AI has access to necessary tools
   - Ensure AI model is selected
   - Review AI status (active vs inactive)
4. Check Knowledge Base Connection
Verify:
✓ At least one datastore or datasource is connected (if needed)
✓ Documents are fully processed (status: "Ready", not "Processing")
✓ Content is relevant to email topics
✓ No errors in knowledge base indexing
✓ Knowledge sources are accessible

To check:
1. Go to inbox Settings
2. Review connected datastores/datasources
3. Click on each to verify status
4. Re-add knowledge if needed
5. Wait for processing to complete
5. Review AI Employee Instructions
Check instructions for:
✓ Clear response guidelines
✓ No conflicting rules
✓ Appropriate tone and format specified
✓ No instructions preventing responses
✓ Escalation rules are reasonable

Common instruction issues:
✗ "Never respond to emails" (contradictory)
✗ Overly restrictive conditions
✗ Missing response format guidance
✗ Conflicting escalation rules
6. Check Email Content
Consider:
- Is email extremely long? (may exceed token limits)
- Is email only images with no text? (AI needs text)
- Is email in a supported language?
- Does email contain spam triggers?
- Is email format unusual or corrupted?

Test with simple text email to isolate issue.
7. Review System Logs (if available)
If you have access to logs:
1. Check inbox activity logs
2. Look for error messages
3. See if AI attempted to respond
4. Note any error codes
5. Check timestamps for delays
8. Check Account Status
Verify:
✓ ZappWay account is active
✓ Subscription is current
✓ No service restrictions
✓ API quota not exceeded
✓ No account suspension

Issue 3: Slow Response Times

Problem: AI takes too long to respond to emails Symptoms:
  • Responses take several minutes (5+ minutes)
  • Inconsistent response times
  • Some emails get quick responses, others very slow
  • Timeout errors in logs (if visible)
Solutions: 1. Optimize Knowledge Base Size
Review and reduce:

Check current knowledge:
1. Go to inbox Settings
2. Count connected datastores and datasources
3. Review size of each source

Recommendations:
✓ Keep 3-5 datastores maximum per inbox
✓ Each datastore under 50 documents ideal
✓ Remove unused or irrelevant sources
✓ Split large documents (over 100 pages)
✓ Archive old/outdated content

Actions:
1. Remove unnecessary datastores
2. Keep only most relevant documents
3. Create focused, topic-specific knowledge bases
4. Test response time after changes
2. Simplify AI Instructions
Current issue: Complex instructions slow processing

Optimize instructions:
✗ Avoid: Extremely long instruction sets (1000+ words)
✗ Avoid: Complex multi-step conditional logic
✗ Avoid: Too many nested rules
✗ Avoid: Excessive tool usage requirements

✓ Use: Clear, concise instructions (200-500 words)
✓ Use: Simple decision trees
✓ Use: Essential rules only
✓ Use: Minimal necessary tools

Example optimization:

Before (slow):
"You must first check X, then verify Y, if Y is true check Z, 
unless A or B or C, in which case check D, but if D is false 
and E is true then check F, unless G applies..." [continues for 500 words]

After (fast):
"Answer questions using the knowledge base. Be helpful and concise. 
Escalate if: customer is angry, technical issue, or refund over $100."
3. Check Email Volume
High volume can cause delays:

Assess volume:
- How many emails per hour?
- Are there traffic spikes?
- Batch processing occurring?

Solutions:
✓ Distribute load across multiple inboxes
✓ Use filters to route different types separately
✓ Upgrade plan for higher throughput (if available)
✓ Implement email throttling on sender side
✓ Contact support for enterprise options

Immediate fix:
1. Create additional inboxes for different purposes
2. Forward different types to different inboxes
3. Reduces processing queue for each
4. Monitor System Status
Check for platform issues:

1. Visit: status.zappway.ai (if available)
2. Look for:
   - Ongoing incidents
   - Performance degradation
   - Scheduled maintenance
   - Known issues

If system issues:
- Response times may be affected globally
- Wait for resolution
- Status page will show updates
- Normal operation resumes after fix
5. Review AI Model Settings
Optimize for speed:

Current settings:
1. Go to AI Employee configuration
2. Check model type
3. Review token limits
4. Check temperature setting

Speed optimizations:
✓ Use faster model if available (GPT-3.5 vs GPT-4)
✓ Lower max tokens (faster generation)
✓ Reduce temperature slightly
✓ Disable unnecessary tools

Trade-off considerations:
- Faster models may be less accurate
- Lower tokens = shorter responses
- Balance speed with quality needs
6. Check Network and Infrastructure
Technical checks:

Browser:
- Clear cache and cookies
- Try incognito/private mode
- Test different browser
- Check internet connection speed

System:
- Restart browser
- Check firewall settings
- Verify no VPN issues
- Test from different network

Issue 4: Duplicate Responses

Problem: Recipients receive multiple copies of the same AI response Symptoms:
  • Same email sent 2, 3, or more times
  • Recipients complain about duplicates
  • Email logs show multiple sends for one inquiry
Possible Causes and Solutions: 1. Multiple Forwarding Rules
Check your email provider:

1. Log in to email provider settings
2. Go to forwarding section
3. Look for duplicate rules

Common issues:
✗ Same address added twice
✗ Two different rules forwarding to ZappWay
✗ Forwarding enabled in multiple locations

Fix:
1. Remove all forwarding rules
2. Add single rule with correct address
3. Save and test
4. Verify only one copy arrives in ZappWay
2. Multiple Inboxes Receiving Same Emails
Check ZappWay configuration:

Issue: Multiple ZappWay inboxes forwarding from same email

1. Go to Email Inboxes page
2. Check all inbox forwarding addresses
3. Verify same email isn't forwarding to multiple ZappWay inboxes

Fix:
1. Use one inbox per business email address
2. Delete duplicate inboxes if found
3. Consolidate into single inbox
4. Test to confirm single response
3. Email Provider Loop
Check for forwarding loops:

Issue: Email provider forwards to ZappWay, ZappWay responds, 
provider forwards response back to ZappWay

Fix:
1. Ensure ZappWay responses are NOT being forwarded
2. Set up filter to exclude responses from @mail.zappway.ai
3. Only forward original incoming emails
4. Test carefully
4. Retry Logic Triggering
System may retry if initial send appears to fail:

Usually temporary and resolves itself.

If persistent:
1. Contact [email protected]
2. Provide example email with timestamps
3. Include inbox configuration
4. We'll investigate retry behavior
5. Browser/Session Issues
Client-side duplication:

1. Clear browser cache and cookies
2. Log out and log back in
3. Try different browser
4. Check if issue persists
5. May be display issue vs actual duplicates

Issue 5: Emails Going to Recipient’s Spam

Problem: AI responses are marked as spam by recipients Symptoms:
  • Recipients don’t see responses
  • Responses found in spam/junk folders
  • Complaints about missing replies
  • Low email deliverability rate
Current Limitations: Important Note:
  • Emails are sent from @mail.zappway.ai domain
  • You cannot currently use custom sender domain
  • This may affect deliverability for some recipients
  • Custom sender verification is not yet available
Solutions Within Current System: 1. Improve Email Content
Avoid spam triggers in AI responses:

✗ Don't use:
- ALL CAPS TEXT
- Excessive exclamation marks!!!
- Spam words: "FREE", "WINNER", "CLICK HERE NOW"
- Too many links (5+ links)
- Large images without text
- Suspicious or shortened URLs

✓ Do use:
- Professional, clear language
- Normal capitalization
- Relevant, helpful content
- Minimal links (1-3 max)
- Plain text or simple HTML
- Full, reputable URLs
2. Optimize AI Instructions for Deliverability
Configure AI to avoid spam patterns:

Instructions to add:

"Response Guidelines:
- Use professional, natural language
- Avoid spam trigger words
- Limit links to 2-3 maximum
- Don't use excessive formatting
- Keep responses clear and concise
- Be helpful, not promotional"
3. Ask Recipients to Whitelist
Proactive communication:

When setting up:
1. Inform your customers/users
2. Ask them to add @mail.zappway.ai to contacts
3. Provide whitelist instructions
4. Include in onboarding materials

Email template:
"Note: Automated responses come from @mail.zappway.ai. 
Please add this address to your contacts to ensure delivery."
4. Test Before Full Launch
Pre-launch testing:

1. Send to multiple email providers:
   - Gmail
   - Outlook
   - Yahoo
   - Corporate email servers
   
2. Check spam folder on each

3. Have test users report:
   - Did email arrive in inbox?
   - Was it marked as spam?
   - Any formatting issues?

4. Adjust AI instructions based on results
5. Monitor and Adjust
Ongoing monitoring:

Track:
- Response delivery rates
- Spam complaints
- Recipient feedback
- Bounce rates

Adjust:
- Refine AI response content
- Reduce link usage
- Simplify formatting
- Update instructions
Future Solutions: Custom sender verification (coming soon) will allow:
  • Sending from your own domain
  • Better deliverability
  • SPF/DKIM configuration
  • Professional appearance

Issue 6: Cannot Access Email Inbox Settings

Problem: Cannot open or access inbox settings/configuration Symptoms:
  • Settings button doesn’t work
  • Page doesn’t load
  • Error messages when accessing settings
  • Blank or frozen settings page
Solutions: 1. Browser Issues
Try these browser fixes:

1. Refresh the page (F5 or Ctrl+R / Cmd+R)
2. Hard refresh (Ctrl+Shift+R / Cmd+Shift+R)
3. Clear browser cache:
   - Chrome: Settings → Privacy → Clear browsing data
   - Firefox: Options → Privacy → Clear Data
   - Safari: Preferences → Privacy → Manage Website Data
4. Try incognito/private mode
5. Try different browser (Chrome, Firefox, Safari)
6. Update browser to latest version
2. Session/Login Issues
Authentication problems:

1. Log out completely from ZappWay
2. Clear cookies for zappway.ai domain
3. Log back in with correct credentials
4. Navigate to Email Inboxes
5. Try accessing settings again
3. Permission Issues
Check account permissions:

1. Verify you have appropriate role/permissions
2. Contact workspace administrator
3. Ensure account is not restricted
4. Check if feature is available on your plan
4. Network/Firewall
Connection issues:

1. Check internet connection is stable
2. Disable VPN temporarily
3. Check if corporate firewall blocking
4. Try different network (mobile hotspot)
5. Contact IT if on corporate network
5. Contact Support
If none of above works:

Email: [email protected]
Include:
- Browser and version
- Operating system
- Error messages or screenshots
- Steps to reproduce
- Account email

8. Best Practices

AI Configuration Best Practices

Create Email-Specific AI Employees: Don’t use generic AI Employees for email. Create specialized ones: Good Email AI Configuration:
Name: Email Support Bot

Instructions:
You are a customer support representative responding to emails for [Company].

Email Response Format:
1. Greeting with customer's name (if available)
2. Acknowledge their specific question/concern
3. Provide clear, helpful answer
4. Include relevant links or resources (max 2-3)
5. Offer additional assistance
6. Professional closing with signature

Response Length:
- Keep responses to 3-5 short paragraphs
- Use bullet points for lists
- Break up long text into sections
- Don't send walls of text

Tone Guidelines:
- Professional but friendly
- Clear and concise
- Empathetic to concerns
- Solution-focused
- Positive and helpful

Knowledge Usage:
- Always search knowledge base before responding
- Cite specific help articles when relevant
- If answer not found, admit it and escalate
- Never make up information

Escalation Rules:
Escalate to human agent if:
- Customer expresses frustration or anger
- Issue involves money over $100
- Technical problem requiring engineering
- Security or privacy concerns
- Explicit request for human agent
- You cannot find answer in knowledge base

Format:
- Use proper paragraphs
- Include white space for readability
- Bold for emphasis sparingly
- Numbered lists for step-by-step
- Bullet points for features/benefits
Poor Email AI Configuration:
Name: AI Bot

Instructions:
Help customers

[End of instructions - too vague]

Response Quality Guidelines

Anatomy of a Great Email Response: 1. Personalized Greeting
✓ Good:
"Hi Sarah,"
"Hello John,"
"Hi there,"

✗ Avoid:
"Dear Customer" (impersonal)
"To whom it may concern" (too formal)
No greeting at all
2. Acknowledge Specific Issue
✓ Good:
"I understand you're having trouble logging into your account."
"Thank you for your question about our pricing."
"I'm sorry to hear you're experiencing issues with the product."

✗ Avoid:
"I got your email." (too vague)
"Thank you for contacting us." (generic)
Ignoring what they asked
3. Provide Clear Solution
✓ Good:
"Here's how to reset your password:

1. Go to www.company.com/login
2. Click 'Forgot Password?'
3. Enter your email address
4. Check your inbox for the reset link
5. Follow the link to create a new password"

✗ Avoid:
"Just reset your password." (no details)
"It's on the website." (not helpful)
Overly technical jargon
4. Include Helpful Resources
✓ Good:
"You can find more information in our Help Center:
https://help.company.com/password-reset

For video tutorials, visit:
https://company.com/tutorials"

✗ Avoid:
Too many links (5+)
Generic "check our website"
Broken or incorrect links
No links when they'd be helpful
5. Offer Additional Help
✓ Good:
"Is there anything else I can help you with?"
"Feel free to reply if you have any other questions."
"Let me know if this solves your issue or if you need further assistance."

✗ Avoid:
Abrupt ending
"This conversation is now closed."
No follow-up offer
6. Professional Closing
✓ Good:
"Best regards,
Customer Support Team
[email protected]"

"Thank you,
[Company Name] Support
help.company.com"

✗ Avoid:
No closing at all
"Regards" only (too brief)
Overly casual "Cheers" (unless brand appropriate)

Knowledge Base Organization

Organize Knowledge by Inbox Purpose: Customer Support Inbox:
Datastores:
✓ Help Documentation
  - Getting Started guides
  - Feature explanations
  - Best practices

✓ FAQ Database
  - Common questions
  - Quick answers
  - Category organized

✓ Troubleshooting Guides
  - Problem → Solution format
  - Error messages
  - Step-by-step fixes

Datasources:
✓ Product Manual (latest version)
✓ Quick Reference Card
✓ Video Tutorial Links
Sales Inbox:
Datastores:
✓ Product Catalog
  - All products/services
  - Features and benefits
  - Technical specifications

✓ Pricing Information
  - Current pricing
  - Plan comparisons
  - Discounts and offers

✓ Case Studies
  - Customer success stories
  - ROI examples
  - Industry-specific use cases

Datasources:
✓ Sales Scripts
✓ Objection Handlers
✓ Competitor Comparison
General Info Inbox:
Datastores:
✓ Company Information
  - About us
  - History
  - Team bios

✓ Services Overview
  - What we offer
  - How it works
  - Who it's for

Datasources:
✓ Contact Directory
✓ Office Locations
✓ Press Kit

Content Maintenance

Keep Knowledge Current: Weekly Tasks:
□ Check for outdated information
□ Add new FAQs from recent questions
□ Update any changed policies
□ Review AI responses for accuracy
□ Note areas needing more documentation
Monthly Tasks:
□ Major review of all knowledge sources
□ Remove deprecated information
□ Add new product documentation
□ Update pricing if changed
□ Refresh case studies and examples
□ Test AI with common questions
□ Analyze response quality
Quarterly Tasks:
□ Complete knowledge base audit
□ Reorganize content if needed
□ Archive old versions
□ Plan new documentation
□ Update training materials
□ Review competitor changes
□ Assess knowledge gaps
Document Quality Standards: Every document should be:
  • ✓ Accurate and up-to-date
  • ✓ Clear and well-formatted
  • ✓ Properly titled and categorized
  • ✓ Free of broken links
  • ✓ Relevant to customer needs
  • ✓ Easy for AI to parse and understand
Content Update Process:
1. Identify outdated content
2. Draft updates
3. Review for accuracy
4. Update in knowledge base
5. Test AI responses
6. Document changes
7. Notify team

Email Signature Best Practices

Professional Signature Template:
Best regards,
[Company Name] Support Team

📧 [email protected]
🌐 https://help.yourcompany.com
📞 1-800-XXX-XXXX

[Company Name] - [Tagline]
Signature Best Practices: Include:
  • Team or department name
  • Company name
  • Website URL
  • Support contact email
  • Help resources link
  • AI disclosure (optional but recommended)
Avoid:
  • Personal names (unless assigned human agent)
  • Too many links (looks spammy)
  • Large images or logos
  • Excessive formatting
  • Promotional content in every email
  • Outdated contact information
AI Disclosure Examples: Option 1 (Transparent):
Note: This response was generated by our AI assistant. 
For human support, reply to this email.
Option 2 (Subtle):
This is an automated response. A team member will follow up if needed.
Option 3 (Integrated):
Our AI-powered support system has processed your request.
For additional assistance, contact [email protected]

Testing Strategy

Before Going Live: 1. Test Email Flow
✓ Send test email to business address
✓ Verify forwarding to ZappWay
✓ Check AI receives email
✓ Confirm AI generates response
✓ Verify response is sent
✓ Check response appears from correct sender
2. Test Knowledge Base
✓ Ask questions covered in knowledge base
✓ Verify AI finds correct information
✓ Check AI cites sources appropriately
✓ Ensure answers are accurate
✓ Test edge cases
3. Test Escalation
✓ Send emails that should escalate
✓ Verify AI recognizes escalation triggers
✓ Check escalation process works
✓ Ensure human team is notified
4. Test Different Scenarios
✓ Simple questions
✓ Complex questions
✓ Multiple questions in one email
✓ Follow-up emails (conversation context)
✓ Emails with attachments
✓ Emails in different languages
✓ Angry/frustrated customer emails
5. Test Deliverability
✓ Check emails arrive in inbox (not spam)
✓ Test with different email providers
✓ Verify formatting appears correctly
✓ Check links work properly
✓ Test on mobile and desktop
Continuous Testing:
  • Test weekly with sample emails
  • Monitor real customer interactions
  • Gather feedback from team
  • Adjust based on results
  • Document issues and solutions

📞 Support & Resources

Getting Help

ZappWay Support:
  • Email: [email protected]
  • Live Chat: Available in dashboard
  • Response Time: Within 24 hours
When Contacting Support, Include:
  • Email inbox alias or ID
  • Description of issue
  • Screenshots if applicable
  • Email examples (remove sensitive data)
  • Steps you’ve already tried
  • Error messages received
Common Resources:

Community & Feedback

Community:
  • User forum (coming soon)
  • Slack community (request access)
  • Monthly webinars
  • User case studies
Provide Feedback:
  • Feature requests: Via dashboard feedback button
  • Bug reports: [email protected]
  • Success stories: Share with our team!
  • Improvement suggestions: Always welcome

✅ Quick Reference

Setup Checklist

□ ZappWay account created
□ AI Employee created and configured
□ Knowledge base prepared
□ Email inbox created in ZappWay
□ Forwarding address copied
□ Email provider forwarding configured
□ Forwarding tested successfully
□ AI Employee assigned to inbox
□ Knowledge base connected
□ Test email sent and responded to
□ Response quality verified
□ Deliverability checked
□ Team trained on system

Essential Actions Reference

TaskLocationAction
Create InboxEmail Inboxes”New Email Inbox”
Get Forwarding AddressInbox → Install TabCopy address
Assign AI EmployeeInbox SettingsSelect from dropdown
Add KnowledgeInbox SettingsSelect datastores/sources
Test SetupEmail ClientSend test email
View MessagesInbox DashboardClick “Messages”
Update SettingsInbox SettingsModify configuration

Common Commands

Gmail Forwarding:
Settings → Forwarding and POP/IMAP → 
Add forwarding address → 
Enter: [email protected]
Outlook Forwarding:
Settings → Mail → Forwarding → 
Enable forwarding → 
Enter: [email protected]
Test Email Template:
To: [email protected]
Subject: Test Email
Body: Hello, this is a test email to verify the system is working.

Troubleshooting Quick Guide

ProblemQuick Fix
Email not forwardedCheck forwarding is enabled in provider
No AI responseVerify “Activate AI” toggle is ON
Response in spamAsk recipients to whitelist @mail.zappway.ai
Slow responsesReduce knowledge base size
Duplicate responsesCheck for multiple forwarding rules
Can’t access settingsClear cache or try different browser

Support Contact Quick Reference

Email: [email protected]
Documentation: docs.zappway.ai
Dashboard: app.zappway.ai

Last Updated: January 2025
Version: 1.0
Platform: ZappWay Email Inbox

Additional Notes

Future Features (Coming Soon)

  • Custom Domain Sending: Send from your own domain
  • Email Verification System: SPF/DKIM configuration
  • Advanced Routing: Intelligent email categorization
  • Email Templates: Pre-built response templates
  • Analytics Dashboard: Detailed email performance metrics
  • A/B Testing: Test different AI configurations
  • Sentiment Analysis: Track customer satisfaction
  • Multi-language Auto-detection: Automatic language switching
  • Integration with CRM: Sync with Salesforce, HubSpot, etc.

Changelog

Version 1.0 (January 2025):
  • Initial email inbox feature
  • Email forwarding setup
  • AI Employee integration
  • Knowledge base support
  • Multi-inbox management
  • Comprehensive documentation

Thank you for using ZappWay Email Inbox! For questions, feedback, or support, contact us at [email protected]